When provisioning SIP trunk Switchvox from N2Net you will receive some information from the engineer working your project. An example of this information is below.
SIP Username: sip000006_vbl
SIP Password: 4e6d09479b87d
SIP Registrar Server: fs.sip.n2net.net
Codec: g711u
Test DID: 2165552000
Click on SETUP -> VOIP Providers Then Create SIP Provider.


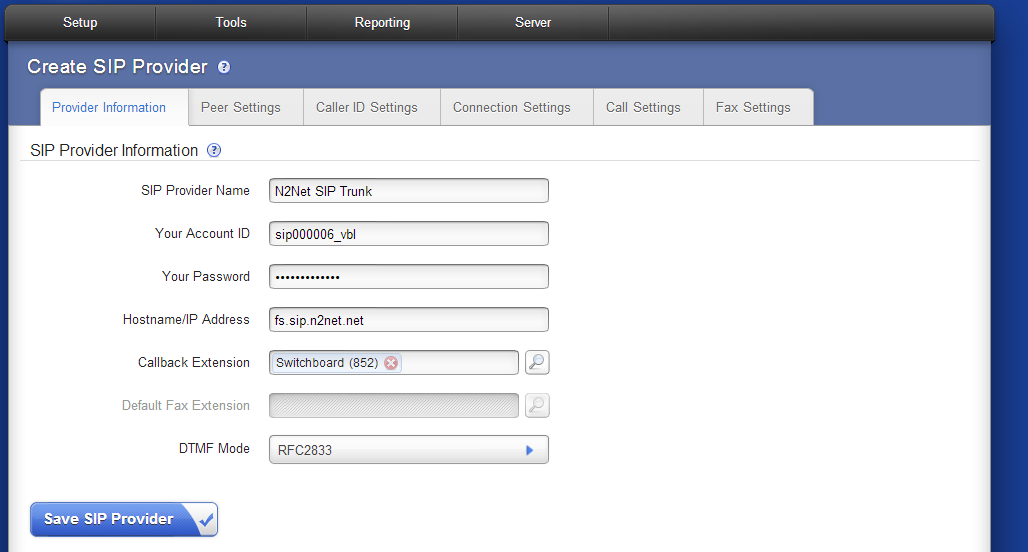
Enter the information you received from your N2Net engineer as show below. NOTE: The call back extension can be any extension on the system. It will be the default destination for calls coming in on this SIP trunk IF there is no match to an Incoming Call Rule.

Settings on the Peer Settings tab can be left as default.
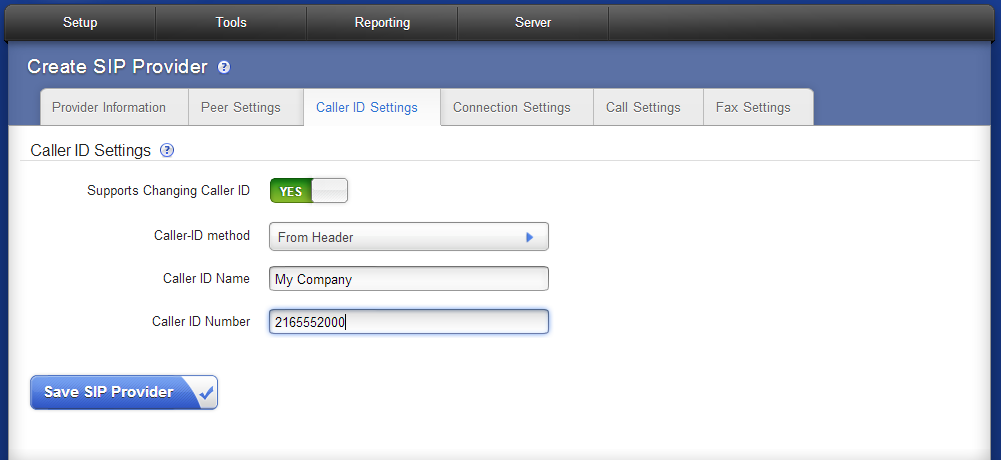
On the Caller ID Settings tabs set the Supports Changing Caller ID to YES and the Caller-ID method to From Header. You may fill is the Caller ID Name and Number fields with whatever you like however we require it be a DID you have through us. This information will be used as the default if it is not modified by an Outgoing Caller ID rule.

The Connection Settings and call settings tabs can be left as default. NOTE: N2Net will only accept calls offering g711u as the audio codec. Keep that in mind of you decide to make changes to the Call Settings tab.
When done click Save SIP Provider. Then click SERVER -> Connection Status to view the state of the newly created SIP trunk.

What you are looking for on the Connection Status page is the green Registered icon under the Status column. If you do not see this please call or submit web request to N2Net tech support at 216 619 2000 option number 2 for further trouble shooting.

Testing your new Switchvox SIP trunk.
In order to test the new Digium Switchvox SIP trunks, you can use the provided Test DID to make a call into your system.
Click on SETUP -> Incoming Calls and then click on Create Single DID route.


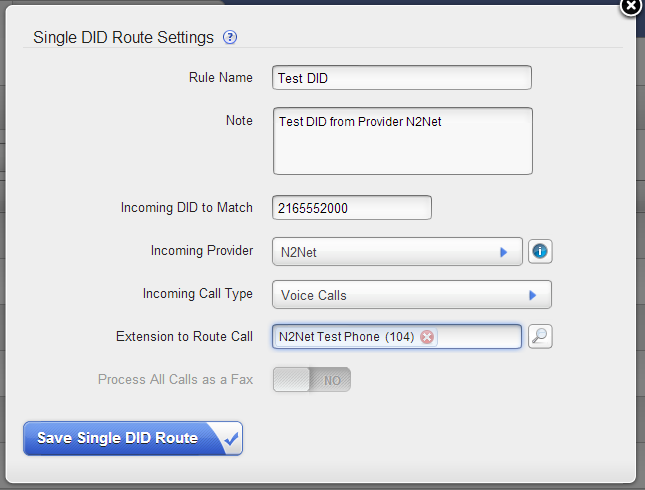
Fill in the details as shown below. The extension to route the call too can be any system extension. In the below example I used a test extension.

Click Save Single DID route and you should be able to make a call to the Test DID. If you have any problems with it please submit web request or call N2Net tech support at 216 619 2000 option number 2
Testing Outbound calling with your new Switchvox SIP trunk.
In order to use the new SIP trunk with your Digium Switchvox system to make an outbound call you first need to make sure the outgoing call rules are set up to use the new N2Net SIP trunk.
Click on SETUP -> Outgoing Calls

Pick the call rule you want to use and edit it by clicking the pencil icon to the right.

Under the Call Through section select the name you previously created for your SIP trunk form the drop down list.

Click Save Outgoing Call Rule and you should now be able to make an outbound call.
If you have any problems with this process please submit web request or call tech support at (216) 619-2000 option number 2.
If you’re a Digium dealer and not yet an N2Net Agent, click below and learn more!
SIP Trunking Switchvox & Switchvox SIP Trunking
